 |
|
The whole purpose of tooling is to keep the wire under control while you make your springs. The important parts of the wire to keep under control are the two ends. This section will tell you how to make the tooling you'll need to keep the ends of your wire under control:
|
|
The important parts of the wire that you want to keep under control are the two ends:
 For wire between .003" and about .025", you'll be using
either a drill or a hand winder to make your springs. For extension
or compression springs, no special tooling is needed for the front
end of the wire. Just make a 90-degree bend in the wire by hand and
stick the bent end in between two of the jaws of your chuck.
For wire between .003" and about .025", you'll be using
either a drill or a hand winder to make your springs. For extension
or compression springs, no special tooling is needed for the front
end of the wire. Just make a 90-degree bend in the wire by hand and
stick the bent end in between two of the jaws of your chuck.
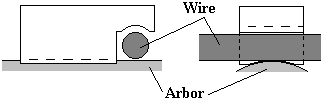 For heavier wire,
you'll need to make a pickup pin to keep the front end under
control. A pickup pin can be made from a square bar, using a
grinding wheel:
For heavier wire,
you'll need to make a pickup pin to keep the front end under
control. A pickup pin can be made from a square bar, using a
grinding wheel:
Notice how the pickup pin has been ground to accommodate both the arbor and the wire.
It's better not to use a three-jaw chuck for heavier wire, but if there's no alternative, you can control the front end of the wire be either drilling a hole in one of the jaws of the chuck and press-fitting a pickup pin into it, or welding a pickup pin onto one of the jaws. Again, it's much safer to use a four-jaw chuck. 'Nuff said.
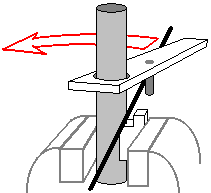
To control the back end of the wire, you'll need a wire guide. What kind of wire guide you'll need depends on the type of spring you want to make and the size of the wire you're using.
For wire up to about .125", you can make a simple wire guide that looks like this:

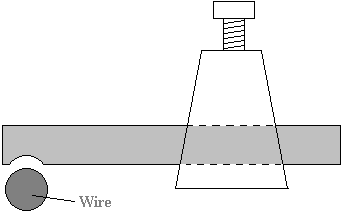
For larger wire, you'll need to make a wire guide that fits into the tool post of your lathe:
If the spring you want to make is longer than your lathe, you will need to make some special tooling. Write to me and I'll tell you how.
You'll also need to make tools to help you finish the ends of extension and torsion springs. Again, the tooling you'll need will depend on the size of your wire.
 Most often, the
ends of extension springs are formed like either loops or hooks. To
form these you will need two tools: the first is a set of looping
plates, which can be made out of flat steel with a grinder. To make
looping plates, first take two pieces of stock (1/4" thick, width
about 1½ times the outside diameter of your spring ) and chuck them
up in a vise, one at a time. Bend the ends to about 100 degrees.
Then, cut off all but a small amount of the end that you bent over:
Most often, the
ends of extension springs are formed like either loops or hooks. To
form these you will need two tools: the first is a set of looping
plates, which can be made out of flat steel with a grinder. To make
looping plates, first take two pieces of stock (1/4" thick, width
about 1½ times the outside diameter of your spring ) and chuck them
up in a vise, one at a time. Bend the ends to about 100 degrees.
Then, cut off all but a small amount of the end that you bent over:
 Using the
grinding wheel, carve out a hollow in each end. Taper it down so
that the edge is sharp enough to "grab" between two coils of wire.
Using the
grinding wheel, carve out a hollow in each end. Taper it down so
that the edge is sharp enough to "grab" between two coils of wire.
These plates work best with relatively stiff extension springs. If you find you're having trouble keeping the body of the spring steady between the plates, you can always cut some grooves on the inside face of the plates to help the wire stay put.
Also note that the sloped area that's been ground away at the top of each plate is somewhat larger than the diameter of the spring.
 The second tool
you'll need to form the ends of extension springs is a hooking rod:
again, you can use your grinding wheel to make this tool.
The second tool
you'll need to form the ends of extension springs is a hooking rod:
again, you can use your grinding wheel to make this tool.
This is a hand-held tool that you'll need a fair degree of control over, so make it about 6-14" long (depending on the size of the spring wire) out of stick that's about a third again as thick as the wire you're coiling.
Notice that the end is relieved to accommodate the wire.
You may want to make an extension spring with extended hooks, like this:
The best way to do this is to coil the spring as if it were a torsion spring and then bend the ends over to form the extended hooks (see the page on torsion springs).
 If you're making
this kind of spring, you'll need to make a different set of plates.
The first will be a thin steel plate with one edge ground
knife-sharp.
If you're making
this kind of spring, you'll need to make a different set of plates.
The first will be a thin steel plate with one edge ground
knife-sharp.
For the other plate, take a piece of flat steel and bend it over just like you did for the looping plates, only bend it over a little more and don't trim quite so much off the end:
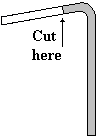
You might also want to make a bending pipe to aid in bending wire larger than can easily be bent by hand. Start with a short section of pipe or tubing that's a little bigger on the inside than your wire. Then, simply cut off the end on a diagonal, like this:
See the section on extension springs for how to use the plates and the bending pipe to form your ends.
 The ends of torsion
springs can be formed in a million different ways. The key is to
make the bends smooth: the sharper the bend, the more likely it'll
break:
The ends of torsion
springs can be formed in a million different ways. The key is to
make the bends smooth: the sharper the bend, the more likely it'll
break:
If you're using light wire, you can probably use round-nose pliers to form your ends. For medium wire, make a layover plate (above) and use a length of pipe to grab the end of the wire. This will give you enough leverage to get it to bend
For wire too big to bend by hand, just heat the bend area of the wire with your acetylene torch. Don't get it too hot --just warm it up enough so that it will bend with the help of a piece of pipe.
 This is the
simplest bending jig I know of: it uses tooling you've already made!
This is the
simplest bending jig I know of: it uses tooling you've already made!
In your vise, chuck up a piece of bar stock, maybe a little smaller than your arbor, and a pickup pin suitable for the wire you're using.
Then, when you lay the leg of your spring between the bar stock and the pickup pin, you can use a wire guide to made the leg bend around the bar stock.
Keeping careful track of how much wire is used up making the bend will allow you to make your bends fairly precisely - with practice, within 1/10".
You can also make a more complex bending jig capable of handling virtually any light wire bend:

You can make stops and guides mounted on top of the jig (to control your spring) out of thin steel, and other stops mounted on the side of the jig out of thicker stock -- 1/8" works well -- to control how far the handle should move (to control the amount of bend).
If you're working with stainless steel wire, you'll need a passivating basket. All a passivating basket has to do is hold the springs while they're taking a bath in some nice acid. You can make one very easily using stainless steel mesh. Just bend the edges of the mesh up to form a basket shape large enough to hold your springs, "stitch" the edges together with stainless steel wire, and make a handle, also out of stainless steel.
Don't use anything but stainless to make your passivating basket -- otherwise, the acid will eat it alive.
A grinding stage is simply a flat piece of material (either steel or wood will work) attached to your grinder. The purpose of a grinding stage is to provide a flat surface that your spring lays on while you're grinding the ends.
Make your stage so that it faces the flat side of the grinding wheel, and is at least as wide as the grinding wheel's side surface.